Saturday, October 8, 2016

Hackaday.io Traveling Hacker Box Stops in North Dakota

The Hackaday.io Traveling Hacker Box recently arrived in the mostly rectangular state of North Dakota. It was full of numerous goodies that any reader of Hackaday would be interested in having.

The Hackaday Traveling Hacker Box is a box full of goodies useful to anyone who tinkers with electronics. Things like microcontroller development boards, LCD screens, ICs, and other parts. It is a project on the Hackaday.io site. Join the project and you might be able to receive the box, take some items you find useful, add some items for other people, and send it on to the next person in the chain.

Here are some photos of the stuff inside:


First we have a bunch of stickers.


A bare BeagleLogic PCB and LCD+CapTouch board, some sort of line scan CCD board, a bunch of random components, a couple motors, and a small LCD.


A couple of standard character LCDs and some LED assemblies.


A TI dev board, a couple LCDs, a PIC programmer, a busted reflow oven controller, MAX7219 based dot matrix LED kits, an NXP dev board, and some other miscellaneous stuff.


A large selection of various integrated circuits, some large green LEDs, vintage transistors.


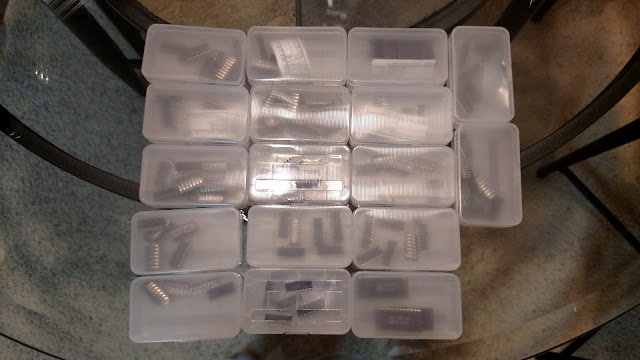
A bunch of small plastic boxes of integrated circuits.


An MB Quart speaker crossover, Vivitar camcorder, Apple charger, Zune MP3 player, and a little orange rover car.


A bunch of Geppetto Electronics PCBs. Most unpopulated. A few GPS oscillators, AVR programmers, PiPower boards, Divide by 3 circuit.


A panel of Crazy Clock PCBs, and an empty panel of some other small PCB. Some smart cards to go with the card reader board, a Parallax RFID reader and an RFID card. Another programmer board, a Cypress PSOC development board, some addressable LEDs wired together, a motor, and some heat shrink.


What I took from the box:


The Parallax RFID card reader and RFID card. I’ve never done an RFID project so I thought this would be interesting.

The BeagleBone BeagleLogic PCB. I have a BeagleBone Black board that I haven’t done much with, so this could be an interesting project and a chance to learn more about the BeagleBone board.

One of the Max7219 LED dot matrix kits, some stickers, three Crazy Clock PCBs (there’s 24 left), and one of the USB ISP programmers.

One of the Geppetto Electronics GPS disciplined oscillator boards.


What I put in the box:


One of my favorite components for motor control or other high current designs is the IXYS IXFN200N07 MOSFET. This is not your average MOSFET. It’s rated for 70 Volts and 200 Amps. And that’s not just a theoretical die current that you can never achieve, like with these MOSFETs that claim ridiculous currents but come in a TO-220 package that can’t dissipate the heat that would be created if the leads into the part didn’t melt first. These IXYS parts come in a package called a SOT-227B, which sounds like another small surface mount package but it’s really a large block with screw terminals on the top. Not your average MOSFET.

Someone could build a really high current H Bridge to control a motor, or maybe a high current dummy load. Bolt them to an old computer CPU heatsink and you could control a lot of current.

I realized that not everything in the box has to be strictly electronic. So I added a small bag with an assortment of terminals. Also a few microswitches that maybe could be used as limit switches in a 3D printer or whatever motorized device ends up being controlled by those giant MOSFETs.

I threw in a webcam PCB. It’s probably not useful for anything but I like how you can see the whole sensor chip and the bond wires.

Also I threw in a couple PCBs with jacks for Left/Right audio, Composite video, and S-Video. Useful for any audio project or anything that needs a few RCA jacks.

And last, but not least, I threw in a back light inverter board. It’s an interesting design with a novel flat transformer. Maybe someone can use or misuse it for some sort of high voltage project.

Oh, I almost forgot that I added a nice Maxxon DC gear motor. And a couple packs of “screen wipes.” They are very nice for cleaning anything from your phone screen to camera lenses to the LCDs in the box.


The box had been crushed a bit in shipping so I decided to reinforce it a bit. I glued a layer of cardboard to the inside sides of the box, then glued pieces in the corners for double reinforcement. It should travel better now. I had thought about replacing the box but I thought it would be better to keep it going with all the tape and stuff on it as it adds character to the box.


I made a video of some of the contents of the box, discussed a few items, and showed what I took and what I put in:


Saturday, September 17, 2016

Unboxing Dell Inspiron 15 7000 Series Laptop Model 7569

Since unboxing videos seem to be popular on YouTube I did a video when I received my new Dell Inspiron 15-7569 laptop.  I discuss what I was looking for when shopping for a new laptop, and how I ended up selecting this model, and my first impressions.

I had two specific requirements I was looking for.  First was a 500GB or larger solid state hard drive.  I'd never used a computer with an SSD before but I kept hearing that using an SSD makes a huge difference on how fast a computer runs.  Turns out this was a hard requirement to meet at any reasonable price.  I found many laptops with 250GB SSDs but few with 500GB or bigger.

The second requirement was a 15.6 inch HD screen with an IPS panel.  My previous laptop, the Toshiba that is the subject of my hinge repair videos, has a 720 screen with a cheap panel.  The viewing angle was so small that if you move a little bit up or down the top or bottom of the screen washes out or the colors go wrong.  I was constantly adjusting the screen angle to make it look right, which may have contributed to wear on the hinges.  I wanted something better this time.  I had looked at laptops with HD screens in the local stores and text was much clearer and easier to read.

I also wanted a touch screen. Not sure why as I don't use it a lot, but I had one on the previous laptop.  I figured a 2-in-1 would make the touch screen more useful since I could flip the screen back and use it as a tablet.

But this is where I found that laptop configurations are like car option packages.  If you want a 500 GB SSD and an IPS HD screen, you also have to get the fast i7-6500U processor, 12GB of RAM, AC wireless, a back lit keyboard.  All features that add to the price.  I ended up spending much more than I had planned, but in this situation it's a bit of you get what you pay for.  Watch the video below for more details...


Saturday, July 9, 2016

Estes ProtoX Quadcopter Motor Replacement

In my latest YouTube video I show how to replace a damaged motor in an Estes ProtoX quadcopter.  I received one as a gift, and bumped it into a wall when flying it and damaged one of the motors.  The local RC hobby shop had replacements, so I picked up a set and filmed a video on how to remove the bad motor and replace it.  Note that there are two kinds of motors, one rotates one way and the other rotates tbe other way.  The direction of rotation is indicated by the color of the wires attached to the motor.  One kind has white and black wires, the other has red and blue wires.  You must use one of the same color wires when doing the replacement or the motor will spin the wrong way.  Also, be sure to connect the wires with the proper polarity.  On the white/black motors the white wire should be connected to the point on the PCB with the "+."  On the red/blue motors, the red wire should be connected to the point marked with a "+."


Sunday, April 24, 2016

Battery Pack Failure Prevention

In my first YouTube video I showed the failure of a power tool battery pack that I had rebuilt with new cells I bought online.  The cells have great capacity and long life, but they have one problem.  The thin plastic heat shrink coating fails if the cells rub against each other, causing an internal short that causes the pack to overheat and fail.

In this video I show how I added paper separators between the cells to prevent the failures.  I cut paper strips and slid them in between the cells of the existing packs, in a winding pattern, to prevent shorts.  At the end I show how I wrapped every second cell with individual pieces of paper when I built a new battery pack.


Sunday, April 3, 2016

Craftsman Garage Door Opener Remote Repair

My Craftsman pocket size key chain garage door opener remote quit working.  In this video I take it apart, diagnose the problem, and repair the remote.  I also show how you can check if the remote is transmitting using a software defined radio dongle.

I found a bad solder joint, but the solder joint was not cracked, it looked more like the solder never properly flowed onto the part lead when it was soldered, so that was probably not the reason the remote quit working since it was likely manufactured that way and had been working for a couple years.  

Shortly after I bought it, the little plastic loop on the corner where you attach your key ring broke off, as I am sure happens to every single one of these things ever manufactured, so I replaced it with a small loop of large paper clip wire that I bent into a loop shape.  It turns out that one of the ends of the wire loop had been hitting the circuit board and wore through a trace.  I show how to repair the trace, resolder the bad joint, and fix the problem with the wire loop so it doesn't happen again.


Monday, March 28, 2016

Power Strip FAIL

About a week ago I posted a new video on my YouTube channel where I take apart a power strip that failed on me one day with a loud bang, to see what is inside and how it failed.

One day I was using my desktop computer when it shut down with a bang.  I thought the computer's power supply had failed, but it turned out that it was just the power strip.  The power switch was stuck half way between off and on.  I look at the construction inside, the poor build quality, and how some of the contacts in the outlets are bent back enough that I am surprised the cords plugged in were actually making contact, and I disassemble the failed switch.


Tuesday, January 26, 2016

Self Igniting Propane Torch Repair

Recently I decided to build a fire in my good old-fashioned wood fireplace, and like any well prepared Boy Scout, I planned to light it up the easy way, with my propane torch.  I screwed on the propane bottle and before I even had it tightened, I heard the sound of propane leaking.  My first thought was that the valve was not closed, but I tried to give it a quick clockwise turn and it did not move.  The valve was closed tight.  I realized the sound was actually coming from the inside of the torch handle, so I quickly removed the propane bottle.

When I disassembled the handle to diagnose the problem and make a repair, I also found that the wire clip that connects the ignitor button to the valve body clips on very loosely, and because of this, if the button were pressed, a spark could have occurred inside the handle where the propane was leaking, and the torch could possibly have exploded in my hand.  Any combustible gas has a certain ratio of air to gas to be able to ignite, and too far outside that range and the gas won't burn.  I don't know how wide that range is with propane, and therefore how likely ignition of the propane inside the handle would be, but the chances are greater than zero.

But, back on the failure.  I disassembled the torch and found the tube that connects the bottle fitting to the valve was no longer properly attached to the bottle fitting.   In the video I show this failure, provide a quick discussion on how the torch works, and I perform a repair and demonstrate that the torch is working again.

I do not know when this failure occurred.  The torch worked fine last time I used it.  Therefore, for safety reasons, I do not recommend leaving a propane bottle attached to a torch when it is not in use and being monitored by someone qualified to assure that it is working properly.  And do not press the ignitor button on a torch if you have any reason to believe it could be leaking propane or is not otherwise in perfect working order.